


How to make a Farmhouse Sign on a Budget
Want to make a custom farmhouse sign on a budget? It is simple and inexpensive. This blog post has all the directions you will need!

Farmhouse signs are such a fun addition to home decor. If you want to make one, this is a super easy process! It is the printer paper technique and a great way to make a custom sign for you home. Follow along to see how to make a farmhouse sign on a budget.
Check out my 60 second DIY Farmhouse Sign tutorial here and then follow along for all the details! Or watch the Youtube video at the end of this post.
Sign SuppliesÂ
- 1×10 wood board (4-8 feet long, depending on how many letters you are using)
- Stain (I like Minwax Provincial or Walnut)
- White Paint (I use Behr Paint and Primer)
- Staining brush
- Rags
- Vaseline
- Modge Podge
- Mirror image prints
- Frosting knife (or any tool with a rounded edge)
- Corner brackets (optional)


Â
Step One – Stain Your Wood
I chose not to sand down my piece of wood because I wanted it rustic. Feel free to sand your edges before staining if you would like them softer.  Grab your stain, darker is better. It will show through the chippy paint areas. I added Weathered Oak first, let dry, then added Provincial around the edges for some darker spots. This isn’t necessary.
P.S. Forgive my grainy photos! I only video taped this DIY and had to take stills from the movie!


Step Two – Add Vaseline
The chippy paint technique is simple as well. I have a detailed blog post here on how to achieve the distressed look using wax as well.
Take your vaseline and rub it lightly onto the edges and corners of your board. Miss some spots on purpose. Then add some in sporadic spots on your board.  The more you use the more of the stain will show through for your outcome.


Step Three – Paint Your Wood
Add a layer of white paint (or any color your prefer) to your board. It doesn’t have to be super covered well, just “good enough.” I use Behr Paint and Primer – I love it for the chippy look! Let fully dry while you work on the next step.


Step Four – Print & Cut Your Words
This part is a little tricky if you do not know how to print a mirror image. Depending on the computer you have, it can be different for each. Here is a link to teach you:
Type out your word and mess with the fonts. I really like Bordeaux Roman Bold LET for my signs. You can fit about 3 letters per sheet if you use the 800 size.  If you don’t have that font you can download it here.

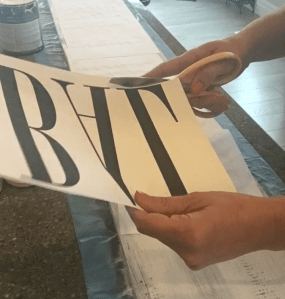
Make sure you fiddle with it on your board to make sure it fits before the next step, which is cutting the letters. You will cut as close to the edge as possible, keeping letters connected if you can. This helps the placement go on smoother.

Step Five – Glue Your Letters
You will dip your brush into the Modge Podge and gentle wipe ON THE INK SIDE of the first set of letters you are going to lay down. Be careful so you don’t rip your letters.Â
You have to take special care when laying them down because they are sticky. You will only have a few seconds to move them around if you need before the glue thickens up. I had a measuring tape to make sure the top and bottom spacing were the same.
Also make sure to get glue over the entire letter. Every bit of ink must have glue on it to adhere well to the board.


You will press the letters fully onto the board to make sure no bubbles are left behind. Let dry completely according to directions before moving on to the next step.


Step Six – Remove Paper
Here is the fun part! Grab a rag and get it pretty wet. Not dripping, but still really moist. Gently press it onto all of your letters, one at a time. This will start the moisture process and help with removal.


Once that is done, head back to the first letter. You will gently and slowly rub the letter to remove the paper. This will leave the ink on the board. If you rub too much the ink will come off too. If you do rub some ink off, just press it back in place. It will dry fine.Â
It’s ok to have some ink rubbed off if you are going for a really rustic look like I was. This process takes time, but is worth it. It’s going to look amazing!


Step Seven – Chip Your Paint
I like to use my frosting knife because it is round but not sharp. You can use any like tool for this. You will take the edge and start LIGHTLY scratching areas of your wood. The edges and around letters are especially good spots. You can also scrape off any extra paper you may have left that needs to be removed. The more you scrape, the more chippy your board will be! This is a great way to get the farmhouse sign look on a budget.


I added metal brackets to my edges for a more complete look. Watch this video to see that process. Spray paint the color you want and drill them on.


Your all done! Such a fun sign for a great price point. I hope this tutorial on creating a farmhouse sign on a budget gives you some inspiration for your home. Let us know how yours turns out!


[…] DIY Farmhouse Sign […]
[…] DIY FARMHOUSE SIGN […]
[…] DIY FARMHOUSE SIGN […]
Totally doing this, thanks to you! Did you use a laser or inkjet printer?
That is such a good question! It’s laser. I think both will work just fine. I am so glad you are here!
Love it ! Great tutorial as well! Definitely going to do this project
I am so glad you are here!
Are you using regular modge podge?
I used the Matte finish!
Thank you for this!! I have had a sign i have been eyeing to buy but didn’t want to spend the $200 on it..
Just curious, can you use vinyl letters that are not mirrored, stick them on, and then modge podge over them??
Absolutely! That would be beautiful! Just be caredful when you sand down the wood. Or I would sand down the wood first and then apply the vinyl after and then seal it. Send me a photo if you make one on my Instagram!
[…] Source: Citygirl Meets Farmboy […]
I downloaded the Bordeaux Roman font – but don’t know how to size the letters to 800.
Isn’t it length and width? TY
Hello! You will have to figure that out within your computer – I am so sorry I am not able to help with that!
I would like to buy the letters you used for the sign. If you forward them to me online, I will take to staples and have printed. I do not have photoshop or any of the programs needed to enlarge and reverse letters. Appreciate it Thanks..
This sign looks beautiful in our kitchen! We absolutely love it and are so glad we could do it together and on our own thanks to your tips. We did it as the finishing touch of a massive kitchen renovation that included a big cabinet painting project we couldn’t do on our own. Although we were extremely happy with the service we used, it was nice to do something on our own. Thank you so sharing.