Hey Everyone
I'm Kelly Ballard
Raised in California and transplanted to Utah. Married my college sweetheart from Montana, and we are raising 4 nuggets together. I love all things DIY projects and doing them on a budget. I don’t mind messing up and am ok with the 90/10 rule - nothing is perfect over here and it’s fine by me! Encouraging all ‘wanna-be’ DIYers to just get out there and try it! You will be so glad you did.”
Categories
do it yourself
home Decor
family
Shopping
find me on
@citygirlmeetsfarmboy
How to Make a Wood Pallet Halloween Fence

Do you want to create simple yard decor on a budget? My kiddos love creepy decor, so years ago I set out to find an inexpensive way to take our yard decor up a notch. I created a Do It Yourself Halloween Pallet Fence and it is so easy. This tutorial will teach you how to make it in just an afternoon.

Wood pallets can be found in many places; local brick yards, an online marketplace, or your local hardware store. Keep your eye out for these because often, they are free for the first to pick up. They make amazing Halloween Wood Pallet Fences.
Materials:

- Old pallet wood or 1×4 inch weathered wood
- 2 wood pieces at 3-4 feet long (bases)
- 6 wood pieces at 2-2 1/2 feet long (fence posts)
- PVC pipe – 3/4 inch (2 strips 2 feet long)
- Rigid 2-Hole Conduit Straps – 3/4 inch (4 pieces)
- Rebar – 1/2 inch by 2 feet (2 pieces)
- Black screws (32)
Tools:

- Mallet or Hammer
- Hand Drill
- Circular Saw
Step One: Sanitize Your Wood
If you are going to put it inside, you definitely need to wash your wood to protect your home from mold and bugs. Additionally, if you are using it outside but storing it inside, you will need to sanitize it.


I have written an entire post on cleaning and sanitizing old wood that you can read here.
Step Two: Cut Your Wood
You will need to use your Circular Saw for this. Make sure you wear glasses to protect your eyes.
Cut two pieces (bases) of your old pallet or 1×4 weathered wood to equal lengths – roughly 3-4 feet (depending on long you want your fence to be). Set aside.

Next you will cut 6 pieces (fence posts) of your wood 2-2 1/2 feet long (depending on how tall you want your fence). I make some shorter or taller for an old look.

Finally, you will angle one end of each of the six smaller pieces. Try to make sure they aren’t perfect, the messier the better. They will look like an arrow when you are done.

Step Three: Assembly
You will lay your bottom base piece onto the ground and then lay the upper base piece parallel to it about 1 1/2 feet apart (or the distance that you like – but it can be no longer that your shortest fence post).
Now you will place your fence posts. Make some straight and some crooked, but take care that non of the bottoms of the wood are past the bottom base or it will not stand up properly.
Drill 2 screws into each post and bottom base connection and top base connection – each post will have four screws in it.

Step Four: Making The Stand
If your are leaning your fence up against a wall and do not need it to stand freely – you are done! I have one for my fireplace (shown above) that just leans. But, if you would like to put them in your yard – read on!
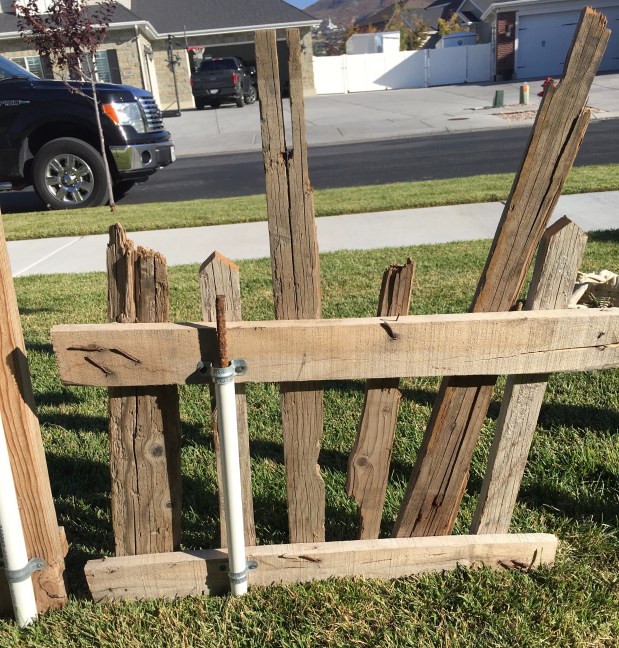
You will turn your fence over and place your 2 pieces of PVC pipe onto the second and fifth fence post. Then you will push the conduit straps over the PVC pipe and on to the top and bottom bases and drill them in!

Step Five: Yard Install
Grab a mallet if you have one (hammer is fine too) and hammer 2 pieces of rebar into the grass about 10 inches deep. You will need to measure the distance between your PVC pipe on your fence to know the distance to install your rebar pieces. Once those pieces are in you will just slide your fence onto them – so snug! It should sit just fine in the wind. But if it does loosen, just pull off the fence and remover rebar, then install them a few inches away.

Here is some more examples of the fences I have built:


Additionally, I made some signs with the same process – check them out!


We hope this DIY Wood Halloween Pallet Fence helps you in your holiday decorating! Let us know if you have any questions. Happy Building!
Love,

Check out similar blogs in HERE
Leave a ReplyCancel reply
Join Me
sign up here to get my best DIY Tutorials straight to your inbox!
A Home Decor & DIY Blog
copyright 2020 Kelly Ballard
designed by Gillian Sarah
earnings disclaimer
follow me on
@citygirlmeetsfarmboy


[…] Chalk Paint Cleaning Plumbers Pipe Pallet Fences Aging Wood Country Chic Paint Plumbers Pipe Shelf Plumbers Pipe TP Holder Wall Art Stool […]
[…] Once the fence is finished, I will attach it to the ground using a rebar technique that I used on one of my Halloween projects. You can learn this technique in HERE […]
[…] Project details: citygirlmeetsfarmboy.com […]
[…] Project details: citygirlmeetsfarmboy.com […]
Love it! My neighbor has a dumpster rental full of these, just in time for Halloween. Does it matter if they’re chemical or heat treated?
I would clean them if they have chemicals. I have a blog post on this too!