Hey Everyone
I'm Kelly Ballard
Raised in California and transplanted to Utah. Married my college sweetheart from Montana, and we are raising 4 nuggets together. I love all things DIY projects and doing them on a budget. I don’t mind messing up and am ok with the 90/10 rule - nothing is perfect over here and it’s fine by me! Encouraging all ‘wanna-be’ DIYers to just get out there and try it! You will be so glad you did.”
Categories
do it yourself
home Decor
family
Shopping
find me on
@citygirlmeetsfarmboy
DIY Mini Barn Doors
Â
I collaborated with two amazing companies for this project – The TAD Company and TACKLIFE Tools. Both are companies I reached out to because I had researched their products and wanted to work with them. I am attaching links to their sites to help you in your purchases. These are not affiliate links. But I was compensated from these companies in product and I was so excited. I know you will love them too!
Welcome to our tutorial of mini barn doors for the home. Go follow us on Instagram here and YouTube here to see all our latest projects!
Â
We love all things barn door over here in the Ballard Home. Last year I built a darling one for our master bedroom for $75 and you can see that post here.  This time around we needed some Mini Barn Doors for our sons playroom and love how they turned out!
Supplies Needed:
- Handles
- Mini Barn Door Hardware (order here)
- MDF Bender Board
- MDF Bead Board
- Wood Glue
- Primer, Paint and Painting Supplies
- 3/4 inch Brad Nails
Tools Needed:
- Circular or Miter Saw (I used my TACKLIFE MITER SAW and loved it!)
- Brad Nail Gun
- Drill and Drill Bits
- Level
- Measuring Tape
- Stud Finder
- Clamps
Step One – Measure
You will need to know the size of door you will need. To find this out you will measure the length and width of your opening. Then add 1.5 inches to those measurements to account for 3/4 inch overhang on each side. When hanging you will make sure you have enough space between the carpet and the door to slide well. I was a total professional and wrote my measurements on my hand!

You will need this measurement for the size of your bead board (mine was 24 inches by 28 inches, and 27 1/2 inches by 37 inches). I was making two doors and they were not the same size.  Additionally you will need the length to wrap your door in MDF Bender Board. This is the length of each side of the door as well as the top and bottom TIMES TWO. You will wrap both sides of the door. This helps with thickness. You will have excess that you will cut off to fit the inside panels.  Note that one side of your door will show bead board, the back side of your door will be plain.
Step Two – Shop
I ordered my barndoor hardware from The Tad Company out of Denver, Colorado. They are a great small shop that makes custom size mini barn doors and sells the hardware. Since I wanted to make the door myself, I only ordered the hardware through them. So if you don’t want to make the door – STOP HERE and just order it through them! They have so many options and you will love their company.
At The Home Depot I purchased my door handles, my MDF bender board and my MDF bead board. The bender board is $3 a piece and I needed 6. I also purchased one 8 x 4 foot sheet of the bead board for $22. I had The Home Depot cut the boards for me so they would be easier to get into the car. This is super easy to do and it’s FREE. Here is my post all about using The Home Depot Cutting Center if you are nervous about it!


Step Three – Make Your Door
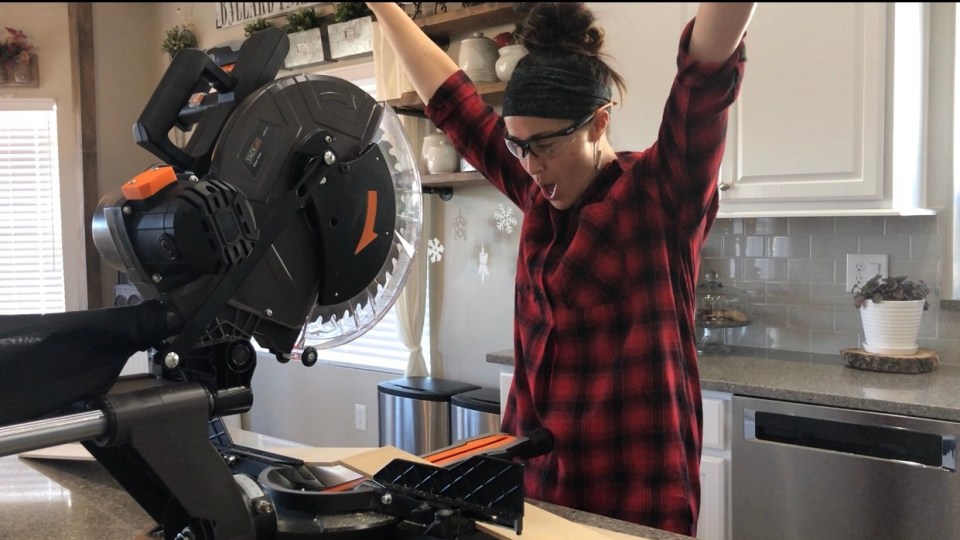
You will gather your tools into one area. For this post it was SNOWING outside and so cold, so I cut in my kitchen. Yes it was messy! But a girls got to do what a girls got to do!
I used my TACKLIFE MITER SAW when cutting my bender boards. More to come on this amazing tool! Mr. Farmboy walked me through all the safety rules before I started.


You will cut four pieces to match your door from the bender board – one for vertical side front and back.

Then you will measure and cut 4 pieces for the top and bottom of the door, front and back.

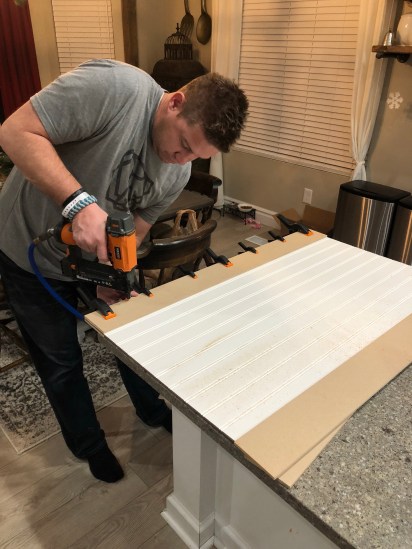
We then used wood glue to adhere the pieces onto the bead board, using clamps to hold it tight while it dried. We had to do each side at a time because we didn’t have enough clamps. The dry time is pretty quick.
Once dried we nailed the board together with 3/4 inch length brad nails and a gun.


Â
Step Four – Paint The Door
Since this is MDF board the paint will SOAK UP very quickly. So you will need to for sure add primer first. I tried using a spray paint with primer in it and it still soaked up the paint. So I used KILZ primer and it worked perfectly.

Since it snowed I had to do most of my painting in the garage. I always use my HomeRight Paint Shelter that you can buy here on Amazon. It works so well!

Â
Step Five – Install
You will have directions from The TAD Company hardware – make sure to follow these.
First you will add your rollers. This is easy to do. Measure where you want them and pre-drill holes. Then attach the rollers with the screws provided.


Then you will measure where you want the long metal slider. Basically you will look for studs in your wall area with your stud finder. If you do not have these you will need anchors. Take out the long metal brace and decide where you want it on the wall. Mark these holes. You will insert the spacers and attach the slider into the marker holes. You can see we practiced this before we painted.
Once this is on you can attach your door and see how nicely it rolls!


We just loved how this turned out! Now our son has all the privacy he needs now and he was super happy. Additionally, we finished off his bunk beds with Beddy’s Beds and he was elated. His room is a great space for him now!

Let me know if you make some, I would love to see your projects!
Love, Kelly

Leave a ReplyCancel reply
Join Me
sign up here to get my best DIY Tutorials straight to your inbox!
A Home Decor & DIY Blog
copyright 2020 Kelly Ballard
designed by Gillian Sarah
earnings disclaimer
follow me on
@citygirlmeetsfarmboy


[…] Quote from the source: … […]