


Do It Yourself – Wood Wall

EEK! I am geeking out at my newest project – like hardcore. I LOVE IT, I LOVE IT, I LOVE IT! Did I mention that I love it? Weaber Lumber Boards are amazing for a Do It Yourself Wood Wall. Ok. Want to see my before?

Amazing right? So here we go….
I discovered Weaber Lumber (pronounced Webber) on Instagram after seeing some amazing walls finished with it and I had to try it out. I am renovating my guest room and it was the perfect wall to do it on. So check out my 60 second video tutorial and then follow along and see how easy it is for anyone to do this DIY! You can grab the boards here from Amazon.
Supplies Needed:
- Weaber Lumber Weathered Wall Boards (search them here at The Home Depot – cut and paste weaber lumber weathered boards)
- Pencil (for marking studs)
Tools Needed:
- Nail Gun (I used our Ridgid 18-Gauge Nailer)
- Handsaw (I used our Ridgid Cordless 18-Volt Circular Saw
- Nails (I used 2 inch Dewalt Brad Nails)
- Stud Finder (Zircon is my favorite)
- Level
- Measuring Tape
We do use affiliate links to help our readers find the products we use. We hope this helps!
There are so many wood boards on the market for your home. We have used shiplap – ripped plywood (read about our post here), laminate flooring, real wood flooring and peel & stick wood. This was our first time trying already weathered real wood pieces and we loved it. Mainly because the prep work is ZERO. Now you need to be aware that this is super raw wood. So if you are planning on putting it in a place where it will get dirty and you will do lots of cleaning, you will need to sand it down and add a top coat for protection. Where it was going in this spare room with little chance of marks, we decided to keep it in its raw form.
Step One: Find Your Studs
You will need to be adding this wood into the studs of your wall. Just grab your stud finder and get to work. Mark where the red line appears (usually every 16 inches). Then you will play connect the dots and draw vertical lines down the wall so you can see as you go where to nail.


Step Two: Prep Your Nail Gun
You will load your gun WHILE IT IS UNPLUGGED. Safety first my friends! Then attach it to your air compressor and get ready for some fun! Here is a photo step by step process.

Brad Nails


Campbell Hausfeld Air Compressor
Step Three: Get Your Wood and Start Nailing
They sell this wood at Amazon in 2 different shades for $25 a box. Each box contains 10.5 square feet.
It’s that easy! Yes, you might want to wipe down your wall first, but if it’s covered up I didn’t worry about old marks. You will have to use your judgement on the lengths of boards you use so that you don’t have to symmetrical of a wall.
The directions are right on the box. You can’t go wrong.


You will want to make sure that the boards are level as you start, because not all ceilings and wall lines are!


Change up the lengths a bit as you see I have done. You can also hang them vertically if you want that look.
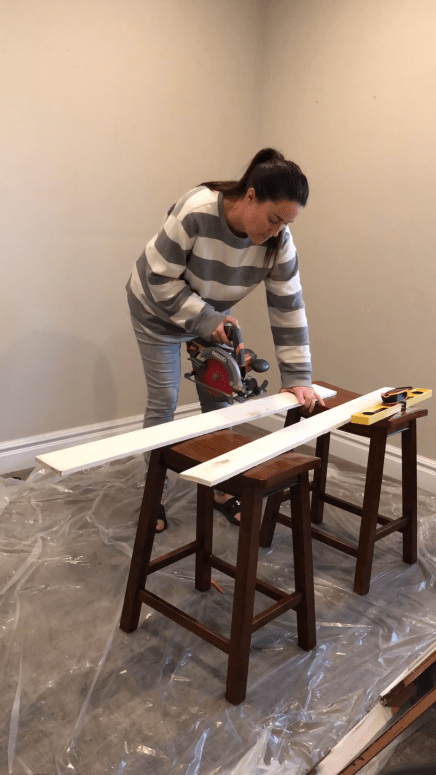
Use your circular saw to cut the boards to fit areas you have measured out with your measuring tape. You should always wear glasses – I was cheating here.
Step Four: Use Your Scraps!
This wood is so awesome you will not want any to go to waste. I had extras so I did the window box as well.

Clean up and you are done! See how easy?


Go check out Weaber Lumber at The Home Depot and tell us what you think! And if you love our Farmhouse Sign, check out how to make it all on your own right here!
Happy Building!
Kelly


[…] Spray Chalk Paint Cleaning Plumbers Pipe Pallet Fences Aging Wood Country Chic Paint Plumbers Pipe Shelf Plumbers Pipe TP Holder Wall Art Stool Reupholstery Miss Mustard Seeds Milk Paint Wood Wall […]
Can you tell me what color the walls are next to the wall boards? We are installing the same boards and deciding on paint colors. Thanks1
Thank you so much for reaching out!! You will love these boards!!! My walls are Sherman Williams Worldly Gray. Message me when you get it done I would love to see it!
Did you paint the wall first. I ask only because i painted my wall now i dont know how long to wait.
Thank you for being here! I didn’t paint it first, just had the old coat of paint on it. But these boards are solid wood and you nail them into the studs so I think you are fine not waiting for the wall to cure. The thing I would worry about is if it’s not fully dry it will stick to the wood and you may pull some off if you removed the wood later. Sorry I am not more help in the paint department!
Hi! Love love this! U guys did great!
I’m totally going to do it! Did you white wash the boards after?
They come white washed!!! So this is so easy because all you do is install. Grab them at home Depot. Send us a photo when you do it!!!
[…] Original Source […]
[…] Download Image More @ citygirlmeetsfarmboy.com […]
Hi, what is the color name or sku# of the weaber boards you used on your wall? Love it?
Hello Carol! Here is a link! https://rstyle.me/+Dxs6BOJ1J8fNJso_bMo_Ig. It is called White Wash Weathered.