Hey Everyone
I'm Kelly Ballard
Raised in California and transplanted to Utah. Married my college sweetheart from Montana, and we are raising 4 nuggets together. I love all things DIY projects and doing them on a budget. I don’t mind messing up and am ok with the 90/10 rule - nothing is perfect over here and it’s fine by me! Encouraging all ‘wanna-be’ DIYers to just get out there and try it! You will be so glad you did.”
Categories
do it yourself
home Decor
family
Shopping
find me on
@citygirlmeetsfarmboy
How to Build Simple Plant Wall Hooks

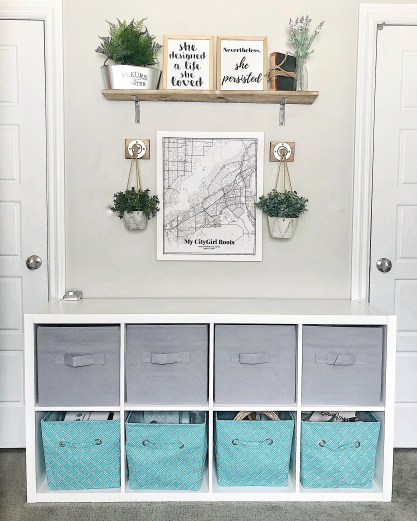
I was needing some space in my office to hang these darling plants from TJ Max. But I didn’t want to spend any money on them. So I rummaged through my box of “extra stuff” to see what caught my eye. That is how the Simple Plant Wall Hook came to be! If you do not need this now, pin it for later on Pinterest and follow along with all my pins here.
Supplies:
- 1×4 scrap of wood (2)
- Stain color of your choice
- Ikea Ekorre hooks (2)
- Two inch drywall screws (8)
- Drywall anchors (optional)
Tools:
- Circular Saw
- Sander
- Drill
- Stud Finder
This is a great beginner project. You can’t mess it up and can do it A.B.Y.S. (all by yourself)!
Â
Step One – Cut and Stain Wood
Decide the size you want for your base wood piece. I used a 1×4 scrap of wood and cut them at 4.5 inch lengths (the real size is 3.5 x 4.5). I sanded the edges down for softness (use a hand sander or just sand paper with about 80-120 grit paper). Then I added one coat of stain. My choice was Minwax Special Walnut. Make 2 of theses.

Â
Step Two – Add Hooks
The Ikea Ekorre Suspension Hooks are used for the Ikea swings. I love them and they only cost $3.50 for two!
Snag those here and grab your silver 2 inch screws. If you want a different color of hooks I would use Rustoleum Metallic Spray Paint that sticks to metal.
First off, you have to see if where you are hanging your hook is over a stud. Use your stud finder for this. If it is, just pre-drill your screws into the hook and wood, then mount into the wall – easy! If not, continue reading.
Arrange your hook on the wood, either vertical or horizontal. Both ways will fit your hook onto the wood. I liked mine horizontal.

Pre-drill your 2 inch screws through the wood so they are sticking out just a few millimeters.


Then place this on the wall exactly where you want it hung. Push it hard against the wall then pull away. You will see the marks left for where you want your anchors.
Since this is such a light plant I am using, I chose to only use 2 anchors. I drilled the other 2 screws in just for looks.


I drilled in my anchors into the marks, then replaced the hook and finished drilling the screws into the anchors. I added my last two screws onto the sides for looks.

Â
Step Three – Hang Plants
I just took the rope already attached to my plant and tied it onto the hook. Nothing fancy. I just loved how it turned out!

I added this darling print from Grafomap that you can find here – they have super cool stuff.
Here are links to the products I used:

My office is getting closer to being finished every day!

Happy Building!
Kelly
Leave a ReplyCancel reply
Join Me
sign up here to get my best DIY Tutorials straight to your inbox!
A Home Decor & DIY Blog
copyright 2020 Kelly Ballard
designed by Gillian Sarah
earnings disclaimer
follow me on
@citygirlmeetsfarmboy


You’re alway so very clever! What a great idea, I love those cute hooks! I also love that your digging through your “extra stuff” to come up with a solution – that’s my favorite way to be inspired!
Thank you my dear friend!