Hey Everyone
I'm Kelly Ballard
Raised in California and transplanted to Utah. Married my college sweetheart from Montana, and we are raising 4 nuggets together. I love all things DIY projects and doing them on a budget. I don’t mind messing up and am ok with the 90/10 rule - nothing is perfect over here and it’s fine by me! Encouraging all ‘wanna-be’ DIYers to just get out there and try it! You will be so glad you did.”
Categories
do it yourself
home Decor
family
Shopping
find me on
@citygirlmeetsfarmboy
Do It Yourself Faux Brick Accent Wall

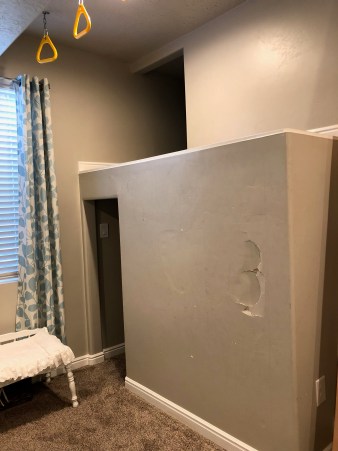
Why did we need a faux brick accent wall in this kids room space? Here is a little back story. We hung monkey bars from my daughters ceiling, not even thinking that the wall could be a casualty of this creative idea. Needless to say, after a year or so – it happened. Someone’s foot went through the wall.


I knew it needed to be fixed, but I also wanted it to be stronger than before so it wouldn’t happen again. I have always wanted a faux brick wall and figured this was a good chance to try it out. Check out my 60 second DIY Tutorial to watch the transformation here.
Supplies Needed:
- Faux Brick Paneling (I grabbed mine from The Home Depot for $29.00 for a 4 x 8 sheet)
- Paint (if you desire a different color)
- Caulking
- Spackling
- Sanding Block
- Corner Edging (optional)
Tools Needed:
- Circular Hand Saw
- Safety Glasses
- Nail Gun
- Air Compressor
- Stud Finder
- Measuring Tape
Step One – Cut Your Paneling
You will measure the sizes you need and cut with your circular saw. This is a very messy job because of the paneling material – so don’t forget your goggles! I would recommend cutting outside if you can.
Here is the large pieces before the cut:

I measured using my straight edge and measuring tape.
Then you will start your cut:

Step Two – Paint
If you like the red brick they you can bypass this step. Or you can paint after install. I just am funny about painting and wanted it done first. I will touch up after as well. For my daughters room I wanted it white. I used my favorite Behr Paint and Primer that was custom matched to our white edging in the room. Then I made an area in my basement to paint on (make sure you are protected from spills if doing this inside!).
Mix your paint well and apply 2-3 coats to make sure the red is all covered.

Step Three – Measure Studs
This paneling MUST be attached to the studs in your walls or it will not stay secure. You can use liquid nails but it will rip off your drywall if you want to remove it later. Use your stud finder and make a line down your wall. Not sure how to use a stud finder? Read my post here to learn how.
Step Four – Mount Paneling
You will use your nail gun for this process. Load your nails while the air compressor is OFF and unattached to your gun.
You may need some help to hold up the paneling as you mount it. My 16 year old son was the prefect guy for the project.
If you mess up the mount, you can slowly pull off the piece, be careful to not bed or crack the paneling. If the nails pull through and stick in the wall, you can pull them out with pliers. I had to do this twice!
Step Five – Add Edging
If needed you will add a piece of edging to your corner. There are many different styles to choose from at The Home Depot. Cut to your needed length and use your nail gun to apply.

Step Six – Cover Your Holes
You will grab some spackling. Add it into your holes where the nails went. You can also use it to cover any lines you do not want to see. I use my finger for this, and then you must let it dry fully.  Once dry you will gently sand off the extra spackling.

Step Seven – Paint Again
You will use your original paint to cover the spackling to match your wall.

Â
Â
Â
Â
Â
Â
Â
Step Eight – Add Caulking
This makes all the edges look smooth as well as protects them from bending or peeling off. We use a screw to insert inside the open hole to prevent drying when not in use.
Slowly press the handle to release the caulking. Once finished it will still push out so I used paper towels to clean up extra mess. You DO NOT want this on your carpet. Spackling will wipe out – caulking will not. Protect the carpet with plastic if you are worried.
I like to use my finger once the caulking is added on to mesh it into the corners. But you can also you a caulking edger.

Once that is dry your wall is ready to go! This Faux Brick Accent Wall was such a great facelift.  Now we just need to get the ladder painted!


Happy Building!
Love,
Kelly
Â

2020 Room Update: We changed this space to an office for me and I absolutely love it! Want a sneak peak? Here you go!

Leave a ReplyCancel reply
Join Me
sign up here to get my best DIY Tutorials straight to your inbox!
A Home Decor & DIY Blog
copyright 2020 Kelly Ballard
designed by Gillian Sarah
earnings disclaimer
follow me on
@citygirlmeetsfarmboy


I wonder how this would look in a kitchen as a backsplash painted white? I bet it would turn out great!
YesI I have seen others do it in the kitchen!!!