


How To Organize Your Pantry on a Budget

Affiliate links are used to help my readers find the products I have featured in the post, in collaboration with The Container Store. Â I hope you find these helpful as you shop for budget friendly items for your pantry! Â Â
I have the tiniest pantry and have wanted to build a larger one for some time. It has been a project weighing on me for years, and I am more than ready to get it done. Here has been the process so far for a Budget-Friendly Pantry Organization:
My kitchen pantry is quite small – a closet with 6 shelves. Â To date I would keep extra food downstairs in a basement closet and run down there each time I needed something for a meal. This isn’t a horrible solution but was inconvenient. Â After my oldest son moved out, we were able to switch some spaces around and began converting an old office into a pantry/mud room. Â
Project One – Peel and Stick Wallpaper Wall
Project Two – Farmhouse Window Frame
Project Three – Chalkboard Wall (blog post coming soon)
Project Four – Pantry Shelving Â
Â


Want to get shopping right away? Here is a link too all the products in this post!

Step by StepÂ
Since it can be an investment (big or small) to organize your pantry, you want to do it right. Going to the store and buying products without understanding what you need can be frustrating and a waste of money. Â A few steps of planning and preparation can make it a worthwhile process.

Â
Step One – Assessment
I cleaned out the old pantry and took note of all the things I liked or didn’t like, what I needed and didn’t need. Â If you are not sure where to start, or what pantry ZONES you might need, here are some good websites that have LISTS of pantry organizations: Â Readers Digest List, Better Homes and Gardens, Martha Stewart, An Organized Life.
Some questions to ask yourself:
- What food products do I like to use on a regular basis? Â How do I want to access them?
- Do I like snack foods out in the open?
- Do I want cereal in boxes or containers? Â What about hot cereals?
- What foods look messy and take up random spaces? Â How can I keep them better organized?
- Do I need or even like the lazy-susan organization system?
- Did I need stackable bins or different size plastic containers?
Since I was building new pantry shelves, I planned out where I wanted different items before I built them. Â This was good information to know before I went into The Container Store to do my shopping. Â
If you are working with an existing pantry, make sure to measure your shelving for width, height and depth. Â This will help you immensely when shopping. Â The Container Store has so many shapes and sizes to fit different needs, so you want to make sure you know what your options are.

All pantries will look different from one another. Â Since mine is a “back-up” pantry, the basic items like spices, cooking supplies, and cans of food, will be held in my small kitchen pantry. The following were the categories that I needed for my pantry organization as well as the type of containers I wanted:
- Dry Goods:Â cereal, flour, rice, oatmeal, etc…
- large bins with sealed lids
- Legumes: beans, lentils, etc…
- medium bins with sealed lids
- Pastas: sauces and pasta
- tall, thin plastic bins with lids
- buckets
- Snacks: kids and friends
- plastic buckets
- glass containers for treats
- Quick Dinner Items: meals for kids to make themselves
- plastic buckets
- School Lunch: my kids pack a school lunch each day
- sturdy plastic baskets
- Paper Goods: we love no dishes
- plastic baskets

Â
Step Two – Shop For Options
I decided I would to go into The Container Store and see what great products they had and how it would fit into my budget. Â If you do not have a store close to you – do not worry. Â You can shop online too! I will be linking all my favorite budget deals later on in the post.
I walked up and down the isles multiple times, tracking sizes and prices. Since I had already made an assessment of what I needed and I was building my shelf to fit my products, I was particular on the depth and height of each product.
The great thing about The Container Store is they have multiple options and prices for each type of product. Â If you want a cereal container – they have a few options and price points. Â If you need a 12 by 12 storage box, they have so many colors, materials and prices to choose from. Â I was confident that I would find things to fit my budget – and I was right.

Â
Step Three – Solidify Choices
I took photos of the products that I wanted as well as their prices. Â I then went home and spent some time to finalize what I needed, what would work, and to make sure the price fit into my budget. Â It is important to make sure what you want will actually FIT. Ask yourself:
- Is it TALL enough? Or too tall?
- Is it WIDE enough? Or too wide?
- Is it DEEP enough? Or too deep?
I searched out the best deals The Container Store had to offer, that fit into my price range. Â All of the items I found were perfect for my budget and my pantry. You will love them! Â The affiliate link to each product is listed below each photo.Â
Dry Goods
I used the Crystal Clear Smart Lock 13.21 Quart size in my space:

I used the Tellfresh Store and Pour 5.3 Quart:

Â
Legumes
I used the Anchor 1 Gallon Glass Cracker Jar:

Â
Pastas
I used the 4.2 qt. Click Clack Pantry Canisters:

Â
Snacks
The Anchor 1.5 gal. Montana Glass Canisters where best for my space:

Â
Quick Dinner Items
I bought the 12 pack of the large plastic storage bins:

Â
School Lunch
I used the Curver Large Knit Basket in Cloudy Grey:

Â
Paper Goods
I used the Large Kiva Storage Bins in Grey:

Step Four – Purchase Items
Since I had already been to the store, I was able to purchase my products online and get them shipped to my home. Â When you take a photo of the price, you will also get the SKU number. Â Just type this into the search bar at CONTAINERSTORE.com and your item will pop up. Â My items shipped fast and I was so happy when they arrived!
 Â
Â
Step Five – Organize Pantry
This is the funnest part! All the hard work is done, now let’s get to the best part.  Getting my packages in the mail was so exciting.  Once opened, I hand washed all my products in warm, soapy water.  I made sure they were fully dry before I used them. Here is a youtube video of the process:
Â
I took some time to arrange them how I wanted them, and it may change as I go. Â But for now it ended up being just perfect. Â Â

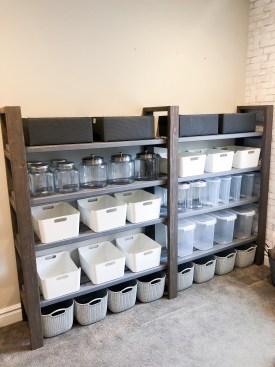
I added all of my paper supplies to the top shelf in the woven rectangle buckets. There were the perfect size.Â

Â
On the left side of the pantry I added treats to the second shelf in the class containers. On the second and third shelf I added quick menu items for my kids to grab for dinner when they are on their own. Â We have A LOT of teenagers are our house and so they know this is their spot to grab something to eat as well. Â The very last section is reserved for all lunch menu items so they can pack their lunches quickly.

Â
On the right side on the second shelf, I used the white plastic buckets to hold extra dinner items for me to grab and use. Â I also made a bucket for hot cocoa and for popcorn (we use these a lot). Â The third shelf was reserved all things cereal and legume based. Â The fourth shelf now has dry products such as flour, rice and flaxseed. Â I use these in bulk and grabbed the large snap on containers. Â The last shelf is once again reserved for all things lunch related.Â

Â

Â
Â
I hope this post has helped you get some ideas of how you can use The Container Store to organize your pantry. Â Now I am off to stock up with food – my kiddos will be so happy!
Â

Make sure to check out these
9 Spring Cleaning Tips & Organization Ideas
Grace In My Space | Mid County Journal | Crisp Collective
She Gave It A Go | Jenna Kate At Home | Designs By Karan
City Girl Meets Farm Boy | The Tattered Pew | Aratari At Home

Love, Kelly
- TikTok – https://www.tiktok.com/@citygirlmeetsfarmboy
- Instagram – ​​https://www.instagram.com/citygirlmeetsfarmboy/
- Facebook – https://www.facebook.com/citygirlmeetsfarmboydecor
- Pinterest – https://www.pinterest.com/citygirlmeetsfarmboy/
- YouTube – https://www.youtube.com/c/citygirlmeetsfarmboy
Budget-Friendly Pantry Organization


[…] | Mid County Journal | Crisp CollectiveShe Gave It A Go | Jenna Kate At Home | Designs By KaranCity Girl Meets Farm Boy | The Tattered Pew | Aratari At […]
[…] | Mid County Journal | Crisp Collective She Gave It A Go | Jenna Kate At Home | Designs By Karan City Girl Meets Farm Boy | The Tattered Pew | Aratari At […]
Kelly, you did such a wonderful job on this. I loved watching you build it and everyone of your choices is perfect! I have total pantry envy over here!
Karan
Thank you karan! This was such a fun project to do and I loved working with The Container Store too!
Kelly, I love seeing how you organized your pantry my friend! I am loving the wallpaper, shelves and all the varying bins from The Container Store you used. I can only imagine how wonderful it feels now! You are always so great at providing insights, resources and encouragement. It’s been a joy to join alongside you on this tour! xoxo-Brendt
Brendt, this has been such a long project and I loved it. Thank you for being there every step of the way along the process!
I love how organized your pantry is! I love all the bins and storage options you chose. Looks so easy to find things!
Arent they so cute? They have the funnest pieces!
Kelly this looks amazing! I love how you broke down the process. Those steps are so helpful!
Thank you for stopping by Sarah! I loved doing this with you!
Kelly is looks SO neat and organized and you shared some great tips!!
You are such an amazing support and I appreciate you more than you know!
I love that you’ve repurposed this space to make it more functional for your family! Plus it looks AMAZING! So inspired to keep this organization train going in our home! XO -Amanda
Thank you cute friend! Wasn’t this so fun to do together? I loved it all!
Kelly this was such a great post! I love how you organized and created a beautiful and functional pantry space!
[…] to see how I organized it? Head to this post to watch the tutorial and get all the links to the products I […]
[…] of you know I built an entire room into a pantry that you can read about here. But now my kitchen closet (aka pantry) needed some love. I found the coolest company […]
I’m trying to plan this and absolutely love it! However the closest container store is 5 hours away and they don’t ship to my zipcode.
You listed your products but can you list the sizes? I’m trying to get a better checklist and price point for when I finally buckle down and road trip to visit friends in the area lol.
This is a great idea!! I will update the blog post right now with sizes! Then when you click on the links, change the sizes accordingly. I hope you send me photos too!
[…] to see how I organized it? Head to this post to watch the tutorial and get all the links to the products I […]